Want Gingham? You’ve come to the right place to learn how to make a Gingham pattern in Paint Shop Pro. You might be able to do the same using Adobe Photoshop, but all screen shots are using Corel Paint Shop Pro X.
Step 1 – Select File/New and create a new image using the following settings:
Step 2 – Make sure your Grid, and Snap to Grid are checked. To do this select View and make sure your Grid and Snap to Grid are checked (see below)
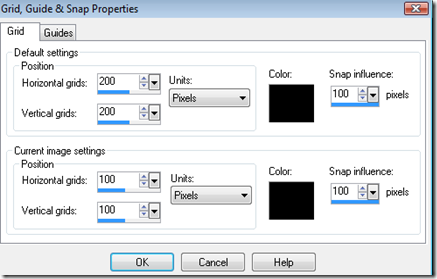
Step 3 – Change your Grid, Guide & Snap Properties. To do this select View/Change Grid, Guide & Snap Properties. The default will come up. Change your settings to what is shown below.
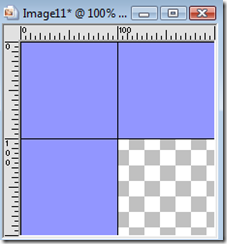
Your transparent new image should now look like this:
Step 4. Using your Selection tool: Create a Square selection placing your marker at the center of the workspace and move to the upper left. **Remember from the 2 layer button tut that you can use your horizontal and vertical markers to find the exact center for your selection. In this tut your exact center would be 100 horizontal and 100 vertical. You should now see “marching ants” around the top left square. (See Below)
Step 5 – Flood Fill with your color choice. Then Selections/Select None
Step 6 – Duplicate the layer and then select Image/Flip. Then Go back to layer 1 and duplicate it again and select Image/Mirror. To DUPLICATE: Right click on the layer and select Duplicate. Now your image should appear as below.
Step 7 – Go to your original layer 1 and make it invisible (DO NOT DELETE IT) just click on the eye next to it until you can no longer see that layer and your image appears as below:
Step 8 – Select one of the other two layers and then select Layers/Merge/Merge Visible. Double click the layer and change the layer properties to 50 Opacity. See below:
Step 9 – Make your original layer visible again and then select Layers/Merge/Merge Visible. Your image should now appear as below:
Step 10 – Create a new raster layer by selecting Layers/new Raster Layer. In your layers pallet move this to under the Merged Layer and flood fill with white. Then select Layers/Merge/Merge Visible. Your image should now appear as below:
Step 11 – Now we will change the size of our canvas to create the gingham checked pattern. Go to Image/Canvas Size and change to the settings below:
Your image should now appear as below:
Step 12 – In your layers pallet make sure you are on your merged layer. Then Duplicate the layer and select Image/Mirror. Then select Layers/Merge/Merge Visible. Your image should appear as below:
Step 13 – You should now have one layer that is titled Merge. Duplicate that layer and then select Image/Flip. Then Layers/Merge/Merge Visible. Your image should now appear as below:
Step 14 – Now we are going to give it a halftone effect. Select Effects/Artistic Effects/Halftone. See below:
Change your halftone settings to the settings below:
Your image should now appear as below:
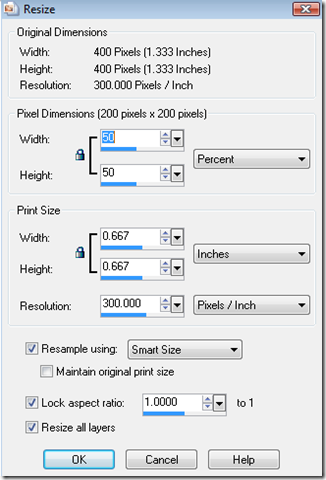
Your final step is to resize to a PSP patterns size and save as a pattern in your patterns folder. To do this: Select Image/Resize/ and use the settings below:
Finally select File/SaveAs and name it whatever you like. Save to My Documents/MY PSP Files/Patterns and it will be available whenever you want it.
Play with the colors and halftone sizing to achieve the look you are wanting. I hope you found this useful and now….go play and have fun!


Thank you Rhonda, I enjoyed learning how to make plaid.
ReplyDeleteYou are welcome Bonnie! Happy PSP-ing!
Delete