Karen has asked for a tutorial on creating custom text that can be fit above an element. Text can be curved using shapes. It can also be created on Bezier curves or straight lines. For custom elements we will need to draw our own line. This tutorial will show you how to use the Pen Tool to create a custom line and then how to add the text and finally hiding your custom line from view.
Tools we will use: Pen Tool, Text Tool
I am using the ribbon Karen was needing the text to which Karen was needing the customization. You can use any element you want to practice this tutorial. I would love to see what you guys and gals come up with!
Step 1 – Open your element that you are wanting to create text around. Go to Window/ Duplicate and then close the original file so that no permanent changes will be made to the element.
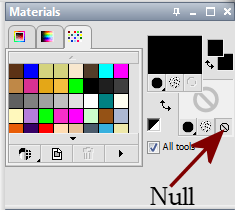
Step 2 – Set your background color to Null and your foreground color to the color of the line you will create. Black always makes a great outline option. We will be hiding this line later so any color will work. Whatever is easier for you to see is what I suggest. For this tutorial I am using Black.
Step 3 – Select your Pen Tool.
Change your line settings to the following:
Starting at the left side of the element we will draw an outline along the top edge of the ribbon using short strokes. You will left click for each node section. See Below.
Continue following along the top edge of the element until you reach the end. Then you will right Click and select Apply.
Step 4 – Click on the layer that has your element on it to make it the active layer. Then click on the eye to the left to make that layer invisible. Your layers pallet will look similar to below depending on the element you are using.
Your image will appear similar to below depending on the element you are using.
Step 5 – Select your Text Tool
and place your curser in the center of your element until you see the Text Tool with a semi-circle under it.
Return to your materials pallet and change the background color to active (click OFF the transparency button). Then set the font size, color, font that you want and begin typing. Continue typing until you have the text you want to appear as you would like it.
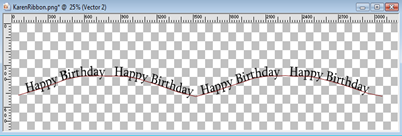
For this tutorial I wanted Happy Birthday to repeat so this is what my text box entry will look like:
Once I have clicked Apply this is what my image looks like:
Step 6 – Return to your layers pallet and click on the eye next to the Vector 1 layer to make it invisible. This is what your layers pallet will look like:
And your image will appear as below:
Step 7 – Return to the layers pallet and click on the eye next to the layer containing your element to make it visible again. This is what your layers pallet will look like:
and your image will appear as below:
To make the text appear above my ribbon I will select the layer that has my element on it to make it the active layer. Then using my Pick Tool (Raster Deform for PSP9 and earlier) I will move the element down. My image will now appear as below:
Now we have made a custom line with custom text to fit above our element. You could even opt to move the ribbon above the text for a different look. Right click on your text layer and select Convert to Raster to add a drop shadow to your text if you would like. You can use this technique to create the text and save just the text as a transparent PNG for use in other projects or to put them together to create a custom element to use in your design projects. Later I will be posting a tutorial on using Bezier curves and Text on Shapes as we progress into the more intermediate tutorials. Look for those in the coming months.
I hope you enjoyed this tutorial and I look forward to seeing your creations!


Thankyou i have always wanted to try this and the way you have explained it is perfect
ReplyDelete