This tutorial was written using Corel Paint Shop Pro X but can also work in versions both below and above X.
Today, we will be making a simple vectored flower. In this tutorial you will learn how to create a simple vector flower, make a custom petal shape for future use, and creating a Tube from your flower for future use. No since in reinventing the wheel if you have already done all the work!
Step 1 – Create a new image using the settings below.
Step 2 – Set your foreground color and background color to the color of the flower. We will use pink for this tutorial.
Step 3 – Click on the Ellipse Shape Tool
Use the following settings to create the circle we will be working with:
Mode: Draw Circle
Create On Vector Checked
Line width 0.00
Anti-alias Checked
Create a circle as shown below:
Right click on the circle and select : Convert to Path
Step 4 – Click on the Pen Tool
Holding down your CTRL key select add a new node next to the bottom node:
Click on the new node and move the arrow up to approximately 90 degrees from the node (directly vertical of the node)
Repeat this with the second bottom node:
It will not be perfect, and that is ok. It is not necessary for them to be symmetrical.
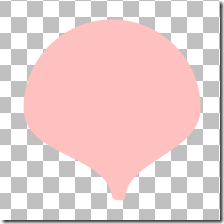
Your circle should now look like the one below:
This will be our flower petal. Now, here is a handy tool for future use. You can save this vector petal as a shape in your shapes folder so later you will not have to create the petal from scratch. Here is how you do that:
Select Object and then Properties
Change the name to MyFlowerPetal and then press OK
Now go to File, Export, Shape
Name it MyFlowerPetal and press OK
Now if you go to your custom shapes folder, your newly created vector petal will appear and can be used to make flowers in the future:
In a later tutorial I will teach you how to make a complete vector flower shape. But we will not cover that in this tutorial.
Now….on to completing our flower!
Step 5 – Let’s add some shading and light to our petal. Select Selections/From Vector Object
Then add a new raster layer: Layers/New Raster Layer and press OK.
We will now airbrush some areas on the petal. This will be hard to see but you can use your outline of the petal as a guide.
Keep your materials pallet the same colors as you used as your petal and select the Airbrush Tool and use the following settings:
Settings:
Shape: Round
Size: 80
Hardness: 0
Step: 26
Density: 30
Thickness: 100
Rotation: 0
Opacity: 30
Blend: Normal
Rate: 23
Brush along the outside edges of your petal. You will not be able to see it just yet, we will get to darkening in a moment.
Once you have gone all the way around your petal on the edges. Go to Adjust/Brightness and Contrast/Brightness/Contrast
Set your brightness to –65 and your contrast to 0
Press OK and your petal should now appear as below":
Keeping the petal selected you will create a new raster layer and use the airbrush, same settings and airbrush the inside part of the petal and then adjust the brightness to 65 with contrast of 0. Your petal should now look similar to the image below:
Now, keeping the area selected, merge all visible layers: Layers/Merge/Merge Visible
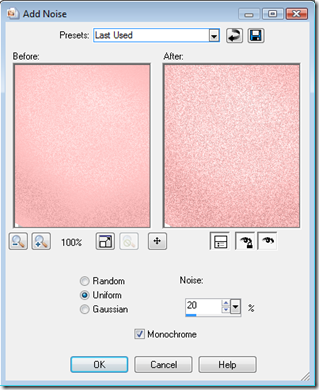
Then Adjust/Add/Remove Noise/Add Noise
Add noise using the settings below:
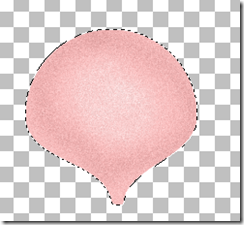
Press OK. Your petal should now appear similar to the one below:
Now select: Selections/Invert (this will select all of the area outside of the selection) You will notice the “marching ants” along the outside area.
Then select: Effects/3D Effects/Drop Shadow
Use the following settings:
Press OK and then Selections/Select None. We are done making our petal! Now we will start forming our flower.
Step 6 – First, we need to center our layer. Using your Scripts Restricted select the Center Layer script and press the play button. The petal will now be centered on our canvas:
Now, in PSPX using your Pick tool, select the petal and change the Y position to 150. In PSP 9 and below you will use your Raster Deform tool for this, but the toolbar looks the same for the settings:
Alright, now we must determine how many petals we want and the rotation required to achieve the number we want in an appealing manner. For this tutorial we will make our flower with 5 petals. Therefore, each petal will need to be rotated 72 degrees. To get the number necessary to create a circle with our petals we take the number of degrees in a circle: 360 and divide it by the number of petals we want 5 our result is 72 degrees.
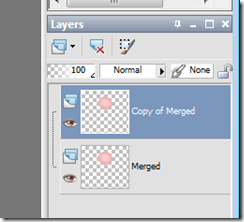
So, click on the petal layer in your layers pallet on the right hand side. Right click and select Duplicate. The layer is duplicated, named copy of merged and becomes our selected layer.
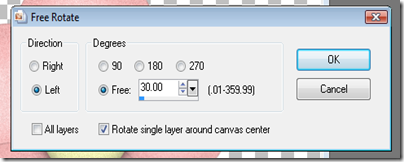
Now we will rotate this selection to begin the formation of our flower. Go to Image/Free Rotate
Now use the settings below to rotate our selected layer.
Your image should look similar to below:
Now, duplicate the newly rotated layer and repeat the same rotation to create your third petal. Your image will appear as below:
Repeat the duplicate and rotate process until you achieve 5 petals and your image appears as below:
Now, select Layers/Merge/Merge Visible. Repeat the Scripts Restricted/Center Layer. Our flower is starting to take form! We will now add a simple center for the flower.
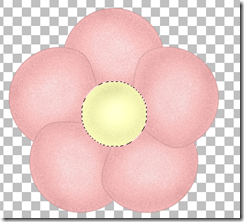
Step 7 – Using your selection tool, create a circle selection using the settings below in the center of the flower:
Your selection should appear as below on your flower:
Add a new raster layer: Layers/New Raster Layer. And flood fill with the color of your choice. For this tutorial I am going to use a pale yellow.
Now, keeping the area selected add a new raster layer, repeat airbrush for the outside edge of the center of the flower, adjust brightness to –65 and contrast to 0. Add a new raster layer and repeat with airbrush this time in the very center and adjust brightness to 65 and contrast to 0.
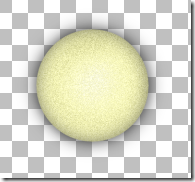
Your center should now appear similar to below:
Now, keep the area selected and make the petals layer invisible:
Now, make sure Raster 3 layer is selected and select Layers/Merge/Merge Visible. We will now add some Noise (same settings as before). Your area should still be selected and appear as below.
Now, keeping the area selected, add a new raster layer. Then select Effects/3D Effects/Cutout. Use the settings below: (You can play with these settings if you would like to create the effect you are looking for)
Press the OK button then Layers/Merge/Merge Visible. Then Selections/Select None.
Your center should appear similar to below:
REPEAT Script for Center Layer
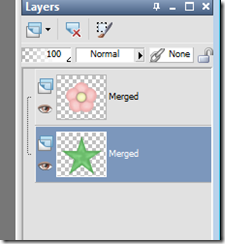
We are going to add some more depth to the center. You should now have only two layers in your layers pallet: Both are named Merged. Make sure you are on the top merged file (center of the flower) and go to Effect/3D Effects/ Drop Shadow and use the following settings:
Repeat the drop shadow again but change the blur to 60. Your center should appear similar to below:
Now make your petals layer visible and then select Layers/Merge/Merge Visible. You should have only one layer now in your pallet named Merged and your image will appear similar to below:
Look! We have a flower! Now, lets add some leaves. I am going to show you a quick and easy way to make petals on this flower.
Step 8 – Select your Symmetric Shape Tool
Make sure your settings are as below:
Mode: Draw Stellated
Create On Vector checked
Number of Sides: 5
Radius: 38
Make sure your line width is set to 0 and Anti-alias is checked.
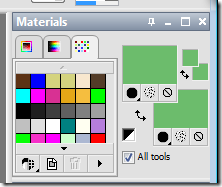
Now, change the foreground color and background color to the color of leaves you want. We will be using a soft green for this tutorial.
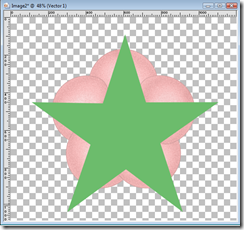
Now, draw your star starting at the upper left of the workspace until you have something similar to this below:
Right click on the layer with the star on it and select convert to raster layer.
Using your magic wand, select the star area and add a new raster layer, create airbrush dark, add a new raster layer, create airbrush light just as before using the same settings. Then, make your flower layer invisible and merge all the star layers together. Then Selections/Select None. Your image should appear similar to below:
Move the star layer below the flower layer. Then make your flower layer visible.
Select your Star Layer Repeat the Center Layer Script and then select Image/Free Rotate/ and use the following settings:
Repeat the Center Layer Script. Then Layers/Merge/Merge Visible. Your flower should now appear similar to the flower below:
Yes! You just made your first simple flower!
Now, let’s get rid of some wasted space around the flower, convert to a tube, and save as a PNG to add to a graphic collection, scrap kit, or wrap kit!
WASTEDSPACE:
Yuck! It makes your image large, and thus makes your collection larger in size than it needs to be! use your magic wand to select the area outside of your flower. Then Selections/Invert so that only the flower is selected. See image below:
Now select: Image/Crop to Selection.
Your wasted space is now gone and your image should appear as below:
SAVE YOUR FLOWER
Now, you can save the flower as a transparent PNG by using File/Export/PNG Optimizer and make sure your transparency is set to Alpha Channel Transparency and Existing Image or Layer Transparency. Name it what you want and then we will move on to creating the tube!
TUBE IT
I like to save some of my graphics as tubes in addition to the actual graphic going into a collection. Simple reason: I don’t have to create it all over again.
Simply select File/Export/Picture Tube
Give it a name use the following settings:
Now if I go to my Tubes Tool the flower appears:
Phew! We are done with our flower! We now have it added to a graphic collection, a tube file, and we have created a custom petal shape! Congratulations! This was quite a bit of work!
I hope you enjoyed this tutorial!















very good, i'm experimenting in making flowers and this really helps, thanks
ReplyDeleteThanks, a super easy and nice tut to follow
ReplyDeleteThanks so much for this tutorial,make my firts flower and learn so much more to do with psp....Thanks for making this possible because of your tuts Rhonda :-)
ReplyDeleteMuch hugs Ellie xx
Sorry for my bad englisch
I am happy you are liking the tutorials and learning! You are welcome for the free tuts! Happy creating!
DeleteEllie...I believe I have the passwords released for the supplies you will need to do the other tutorials. Please try to download again and let me know if you run into any trouble! Thanks!
ReplyDelete