So, I have been promising this tutorial to Nancy for the past couple of days now. After having finished designing a website for someone and making two logos for other clients, I finally have time to sit down and show you one method of shading using Paint Shop Pro. This tutorial was written using Corel Paint Shop Pro X but will work in earlier versions as well as newer versions.
There are various methods to shading in PSP to obtain different effects you will use different techniques. Below is a listing of just a few techniques that can be used.
1. Contour Shading
2. Airbrush or Paintbrush
3. Brightness and Contrast
4. Burn Tool
5. Lighten/Darken Tool
6. Cutout Effect
That is just to name a few. Today, we are going to be using the Contour Shading to make this display below of a pillow box. This makes a great display piece for your website. In addition, you will be learning how to use the pillow box template to design a pillow box. Two tuts in one!
I have bundled the materials into one zip file. The material bundle includes: 1 Pillow Box Template, 1 Paper and a PSP Picture Tube as well as a finished sample display. You can pick up the materials HERE.
Before we get started, be sure to unzip the files and copy and paste the Picture Tube into your Picture Tubes folder within your version of Paint Shop Pro or the location you keep your PSP files. For me, my picture tube files are kept at My Documents/My PSP Files/Picture Tubes. For some, you may have them saved in the program folder itself.
Tools we will be using today:
Mask Tool, Selections Tools, Text Tool, Picture Tube Tool
OK….here we go!
Step 1 – Open your PSP and then open the RDD-PillowBoxTemplate.png file.
Step 2 – Go to Window/Duplicate.
Then close out the original file. *** I suggest always following this step to keep from making permanent changes to your original files! ***
Step 3 – Open the RDD-TeaStainedPaper.jpg file. Then return to your Template workspace file.
Step 4 – Right click on the Raster 1 layer and select Duplicate.
Step 5 – Click on the Raster 1 Eye to make it invisible. Your layers pallet should look like below:
Notice the blue coloring of Copy of Raster 1? This is our ACTIVE layer. So, when I say, make a layer active, simply click on it to designate that layer as what we will be working on.
Step 6 – Right click on Copy of Raster 1 layer and select New Mask Layer/From Image.
Use the following settings:
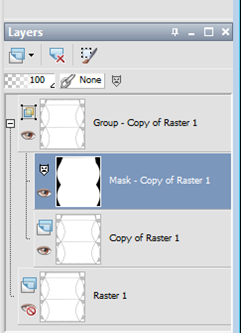
Your layers pallet will appear as below:
Notice the Mask – Copy of Raster 1 is the Active Layer?
Step 7 – Left click and drag the Mask layer ABOVE the Group-Copy of Raster 1.
Your layer pallet will now look like this:
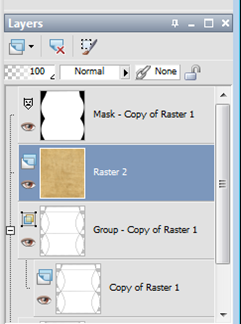
Step 8 – Make Group-Copy of Raster 1 the Active Layer. Then click on the RDD-TeaStainedPaper and go to Edit/Copy. Return to the Template workspace and go to Edit/Paste As New Layer. Your layer pallet will now appear as below:
Step 9 – Make the Mask-Copy of Raster 1 the active layer and go to Layers/Merge/Merge Visible. Your layers pallet will now look like below:
Now double click on the active layer (merged) and name it Background.
Your image should now appear as below:
Step 10 – Click on the Eye of Raster 1 and make it visible again, Double Click this layer and name it Template. Make the Background layer the active layer and click on the Eye of Background layer and make it invisible for now. We will now be using the template for our placement of our text and images. Your layers pallet will appear as below:
And your image will appear as below:
Step 11 – Click on your Picture Tube Tool
Find the RDD-ChristmasBell picture tube and select it.
Use the following settings:
Step 12 – Go to Layers/New Raster Layer and then with your left mouse, click where you want the picture tube to be placed on the new raster layer.
Use your Pick Tool (Raster Deform if using PSP 9 or below) to move the picture tube where you need it to be.
Our image now appears as below:
Make the layer containing your tube as the active layer. Double click it and name it Tube.
Step 13 – Right click on the Tube layer and select Duplicate. Then go to Image/Mirror and then Image/Flip. Use your Pick tool or Raster Deform depending on your version of PSP and move the bell where it needs to be.
Your image should appear as below:
Make the Copy of Tube Layer the active layer and go to Layers/Merge/Merge Down. Your layers pallet should now appear as below:
Step 14 – Click on your background material in your materials pallet and change the color to the color of the text that you want. For this tutorial I am using red.
Now select your Text Tool
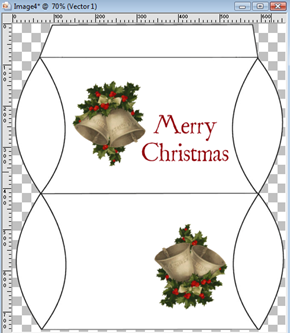
Click where you want the text to appear on your workspace and then set the size and the font that you would like. Be sure you have your stroke set to 0 (unless you want an outline of your text). I am using a font called St. Nicholas at a size of 60 for this tutorial. Use your Pick Tool (Raster Deform) to move the text where you need it. Your image should now appear similar to below.
Step 15 – Right click on your text layer (Vector 1) and select Convert to Raster Layer. Then double click the layer and name it Text. Right click again and select Duplicate. Follow the same as previous……go to Image/Mirror and then Image/Flip and use your Pick Tool (Raster Deform) to move the text where it needs to be. Your image should appear as below:
Step 16 – Make the Copy of Text layer the active layer and then go to Layers/Merge/Merge Down. Click on the eye next to the Background layer and make it visible again. Your image will now appear as below:
You are done designing the pillow box. You can save this as a workspace for later use as a psp image. I would suggest naming it something like MyPillowBoxWorkspace. Then you can go to File/Export/PNG Optimizer to use in your WrapCandy software for printing or to create a printable PDF out of the image. If you are wanting to use the Silhouette Digital Cutter to cut this, make sure you save it as a Jpg file.
Now that we have the pillow box created, and the workspace is saved so we can easily modify it later, let’s create our display piece. We can now close out the RDD-TeaStainedPaper file and then with our template workspace active go to Window/Duplicate and close out the psp file we just created. We don’t want to make any permanent changes to the workspace with the template we just created.
Ready? OK! Here we go! Onward!
Step 17 – Our new image should have 4 layers: Text, Tube, Background and Template. Click on the eye next to the Template layer to make it invisible. Then make your Text layer the active layer and go to Layers/Merge/Merge Visible. Your layers pallet will now only have 2 layers: Template and Merged. We don’t need to rename this layer as we will not be saving this as a psp file…only as a finished image for display purposes. (If you want to save it as psp file you can…..and if you want to name it….you can….up to you).
Step 18 – We are now ready to eliminate unnecessary space and create the final display. Click on your Selections Tool.
Click on the custom selection Icon
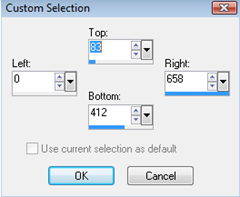
And use the following settings:
Your image should appear with the following “marching ants” around the selection we want to keep.
Step 19 – Go to Selections/Invert
Now make the Template layer the active layer and press your DEL key to eliminate the area we do not need. Repeat this using the merged layer. Then go to Selections/Select None. Your image will appear as below:
Step 20 – Now, click on the eye next to the merged layer to make it invisible and then make the template layer the active layer and click the eye next to the template layer to make it visible. Then using your magic wand tool
Select the inside of the ovals on the left and right of the template. Your image will appear as below:
The “marching ants” appear inside the ovals. Now go to Selections/Modify/Expand
and use the following settings:
Then go to Selections/Modify/Shape Based anti-Alias
and use the following settings:
Then go to Selections/Invert
Step 21 – Now click on the Merged Layer (the layer with our image of our pillow box) to make it active and click on the eye next to the layer to make it visible. Then go to Effects/3D Effects/Drop Shadow
Use the following settings:
You can play with these settings to achieve the look you are wanting. You may want to use a lower opacity and/or blur for lighter backgrounds.
Now go to Selections/Select None. Your image should appear as below:
Now go to Layers/Merge/Merge Visible. You should now have one layer. Go to Selections/Select All. Then go to Selections/Float followed by Selections/Defloat. Then go to Image/Crop To Selection.
Your image will appear as below:
You can now resize as needed and export it as a png file to use as a display.
Another neat idea for a pillow box display is to create the display as below:
To do that…….once you have the ovals selected……you will go to Selections/Modify/ Expand and expand by 3 Pixels and then make the image layer the active layer and press your delete key. This will eliminate the ovals on the image all together. Go to Selections/Select None. Then go to your template layer and select the middle area with the magic wand, go to Selections/Invert and then apply the drop shadow as above.
I know this was lengthy…..but I wanted to cover two tuts in one. So, you learned how to use the template to create a pillowbox and you learned how to do contour shading at the same time. I do hope you enjoyed this tut and I look forward to seeing some of your creations!










No comments:
Post a Comment