-->
Showing posts with label Freebies. Show all posts

Saturday, October 19, 2013

All for Nothing!

You may have seen my previous post regarding my one year anniversary blow out sale.  Well…I am feeling crazy generous today as I have come to a realization!

One…I have been providing tuts and free materials and freebies since 2010.  That is three years worth of fun play time and materials to help you grow your design business. I have had such a time trying to keep up with things since I started my new job a year ago. Things are starting to settle down and I now come to a crossroad where I say….

Two…I plan to add new tutorials and will be offering new materials, methods, freebies, etc.  So….

Out with the old and in with the NEW! 

I am offering the original One Year Anniversary Package absolutely FREE!

That’s right ladies and gents…no need to put on your glasses….you read that correctly…..FREE! 

One Year Anniversary Blowout FREEBIE! 


Advertisement-Freebie

Included in the package are:

Candy Wrapping:

1 Paint Can Set, 2 Sets SOE Sized Overlays, 7 Sets of SOE Sized Papers, and 4 SOE Sets

Designer Tools:

2 PSP Brush Sets, 2 Color Pallet Packages, 3 PSP Shapes Sets

Digital Scrapping:

1 Full Size Kit, 3 Micro Kits, 18 Papers, 1 Quick Page

PSP Scripts:

71 Scripts!  Some never made it to the blog!


LOTS of goodies in this bag! A total resale value of $200.00.

Am I crazy?  Quite possibly!  So take advantage of my temporary insanity and grab this package for  FREE!! 

Click on the link below to download the package. 

Thank you for helping me celebrate this once blogging milestone and making room for new materials!

**NOTE – Not all files will be supported due to the number of files, age of the files and the amount of time it takes to modify them. But always ask…if time permits I will see what I can do! **

Get it HERE!

Saturday, August 7, 2010

Christmas SOE Papers Freebies!

RDD-ChristmasWrapperSOEFreebiesDisplay

This set includes 2 SOE sized Christmas papers (backgrounds) in JPG format.  These can easily be resized to fit a scrapbook page. 

Click HERE to download them now for FREE!

Wednesday, July 21, 2010

2 Layer Button

This tutorial was written using PSPX  but will work in earlier versions, some tools may be different in your version.

Step 1 – Open a new image using the settings below.

image

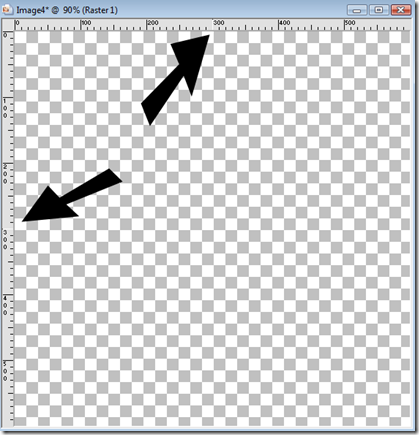
Step 2 – Using your selection tool create a circle making sure your starting points are at 300 and 300 then pull outward until you reach just before the edge of your workspace.

When you position your cursor your 300 vertical and 300 horizontal marks will appear as white.  That is the absolute center of your canvas.  Then you click with your mouse and pull outward.
image

After you pull outward your “marching ants” will appear as below.


image

Step 3 – Go to Selections/Modify/Shape Based Anti-alias and check Outside.  Press OK.  This will removed jagged edges along our selection area. Then Flood Fill with the color or pattern of your choice.

image

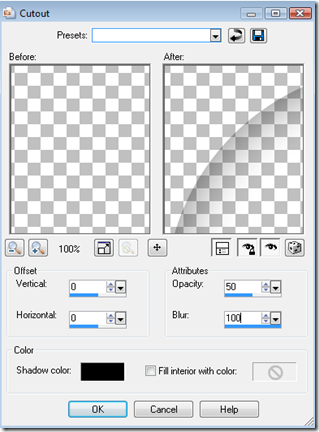
Step 4 – Keeping your selection add a new raster layer.  Then select Effects/3D Effects/ Cut Out.  Use the following settings:
image

Press OK.  Then Select None and then select Layers/Merge/Merge Down.

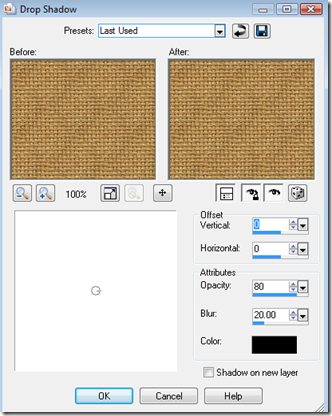
Step 5 – Repeat the above creating a smaller circle, flood fill, new raster layer, effects, 3D effects, Cutout.  BEFORE YOU MERGE:  Select the layer you just flood filled and then select Effect/3D Effects/Drop Shadow and use the following settings:
image

Then select the layer with the Cut Out and select Layers/Merge/Merge Down.  Then use Layers/Merge/Merge Down again so that all layers are now one layer and your bottom and top buttons are mounted on top of each other.

Step 6 – Create a New Raster Layer.  Using your selection tool, starting at your midpoint of 300 horizontal and 300 vertical create a small circle.  (This is the start of your button holes).  Then Selections/Modify/Shape Based Anti-alias/Outside.Flood Fill with WHITE.   Then Select None. Your image should appear as below,

image

Using your Pick Tool (Mover if using versions below X), change your position x to 200.

image 

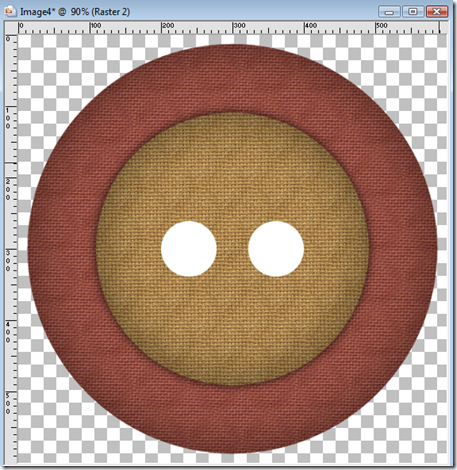
Step 7 – Duplicate your small circle layer and then select Image/Mirror then Layers/Merge/Merge Down.  You should now have an image that looks like the one below.
image

Step 8 – Using your magic wand, select the two white circles and then select the layer that has your button on it and press DELETE. Keeping your selection add a New Raster Layer and select Effect/3D Effects/Cutout and use the following settings:

image

Make sure the layer with your two small circles is invisible. Select the layer with your new small cut outs and select Effect/3D Effects/Drop Shadow and use the same settings for your previous drop shadow.  Then Layers/Merge/Merge Visible.  Your button is now complete.

image

If you want to add thread to your button, add a new raster layer and using your center markers (300 x 300) create a rectangle and then use Selections/Modify/Feather/20 and flood fill with the color of your choice. Your image should appear as below.

image

Keeping the area selected use Effects/Artistic Effects/Halftone and use the following settings:

image

Keeping the area selected use Adjust/Add Remove Noise/Add Noise and use the following settings:

image

Then Select None and using your Script tool…..run the Center Layer Script that comes with PSP. (If you cannot find this it is under Scripts Restricted/Center Layer).  Your image should appear now as below.

image 

Now let’s smooth out the area and make is appear as if it is inside the circles.  Select the layer that has your small white circles we used to make our button holes.  Using your magic wand select both the white circles and then Selections/Invert.  Return to the layer that has your thread on it. Using your eraser tool erase around the outside of the circles just to the left and right.

image

Select None.  Then add a drop shadow to your thread layer using the same drop shadow properties as before. 

Then select the layer with your two small circles we used for the holes and Delete Layer.  Then Layers/Merge/Merge Visible and your button with thread is now complete!

image

You can play around with different settings for your cut outs and drop shadows and threading.  Play around and change it up as you need, but most importantly…..have fun!

I created a script while writing this tutorial.  You can click HERE  to download it for FREE! Works in PSP 9 and Up.

Saturday, July 17, 2010

Ribbon 1 Script

RDD-Ribbon1Display

PRICE:  FREE!

This script ends in a merged file.  3600 pixels in length. Use any colors or patterns for your ribbon. Use for any of your designing needs.

Works in:

Jasc PSP 9

Corel PSP X- X3

USES:

PU/CU/S4H/S4O/Candy Wrapping

See TOU for details.

Click HERE  to download for FREE!

Frames 2 Script

RDD-Frames2Display

PRICE:  FREE!

This script ends in a merged file.  Use any colors or patterns for your frames.  Makes 3 different Metal Rimmed Frames with 1 script! Use for any of your designing needs.

Works in:

Jasc PSP 9

Corel PSP X- X3

USES:

PU/CU/S4H/S4O/Candy Wrapping

See TOU for details.

Click  HERE to download for FREE!

Clips Script

RDD-ClipsDisplay

PRICE: FREE!

This script ends in a merged file. Use anycolor for your clips. Makes 2 clips in 2 shapes with 1 script. Use for any of your designing needs.

Works in:

Jasc PSP 9

Corel PSP X- X3

USES:

PU/CU/S4H/S4O/Candy Wrapping

See TOU for details.

Click HERE to download for FREE!

Button & Rivet Script

RDD-ButtonAndRivetDisplay

PRICE:  FREE!

This script ends in a merged file.  Use any pattern or color for your button and rivet.  Use for any of your designing needs.

Works in:

Jasc PSP 9

Corel PSP X- X3

USES:

PU/CU/S4H/S4O/Candy Wrapping

See TOU for details.

Click HERE  to download for FREE!

Brad Script

RDD-BradsDisplay

PRICE:  FREE!

This script ends in a merged file.  Creates at 300 ppi. Use any pattern or color for your brad. Use for any of your designing needs.

Works in:

Jasc PSP 9

Corel PSP X- X3

USES:

PU/CU/S4H/S4O/Candy Wrapping

See TOU for details.

Click HERE  to download for FREE!

Balloon Script

RDD-BalloonDisplay

PRICE:  FREE!

This script ends in a merged file.  Add your text to the balloon after the script has ran.  Creates at 300 ppi. Use a pattern, gradient or color.

Works in :

JASC PSP 9

Corel PSP X - X3

  USES:

PU/CU/S4H/S4O/Candy Wrapping

See TOU for complete details.

Click HERE to download for FREE!

Scalloped Border Paint Can

This tutorial will show you how to make a scalloped border paint can for your personalized candy wrapping business using Paint Shop Pro.

Step1 – Open a new image using the settings below:

image

Step 2 – Flood Fill the background using whatever color, gradient or pattern you want.

Step 3 – Make a custom selection using the settings below.  Create a New Raster Layer and flood fill with BLACK.

image 

Your image should appear as below.

image  

Step 4 – Deselect (Select None) and select the wave effect. Effects/Distortion Effects/Wave.  And use the following settings.

image

Step 5 – Staying on the same layer, create a new custom selection using the following settings and flood fill with BLACK.

image

Step 6 – Using your magic wand select the black area.  We will now get rid of any rough edges.  With the black area selected choose:  Selections/Modify/Shape Based Anti-alias and then select Outside. Press OK.  Flood Fill with the color, gradient or pattern of your choice and then Select None.

Your image should now appear as below:

image

Step 7 – Select the layer in your layer pallet that has your scalloped border.  Duplicate layer and then select Image/Flip. Select Layers/Merge/MergeDown.  Add a drop shadow if you would like.


image


Step 8 – Using your selection tool, create a selection in the center of your work area.  You can use a square, rectangle, circle, ellipse, whatever you would like here.  I have used an ellipse for this tutorial.  Eliminate the rough edges using the Selection/Modify/Shape Based Anti-alias/Outside option. Create a New Raster Layer and flood fill the selection with the color, gradient or pattern of your choice.  Then using your script tools, deselect the ellipse and run the Center Layer script. (This comes with PSP already installed).  Your image should appear as below:

image

Add your embellishments and personalization and you are ready to print.

image

I have made a script that will make the background and the scalloped border with an ellipse center (You select the colors, gradients or patterns).  You can get it HERE for free!  Works in PSP 9 - X3

Friday, July 16, 2010

Wedding – Printable SOE

RDD-WeddingWrapper1

Price:  FREE!

This package comes with 1 PDF file.  Simply pull up the file and then print and wrap.  This prints 2 SOE candy wrappers per page.  Fits over 1.55 oz candy bars.

Download via 4Shared HERE

Thursday, July 15, 2010

Baby Girl Borders

image

Price: FREE!

This package contains 4 borders 3200 x 800 at 300 dpi. These borders are saved in PNG format.

Use in any graphics program that supports PNG files.

PU/CU/S4H/S4O/Candy Wrapping

See TOU for complete details.

Download via 4Shared HERE

Baby Boy Borders

image

PRICE: FREE!

This package contains 4 borders 3200 x 800 at 300 dpi. These borders are saved in PNG format.

Use in any graphics program that supports PNG files.

PU/CU/S4H/S4O/Candy Wrapping

See TOU for complete details.

Download via 4Shared HERE

SOE Papers Freebie 1

RW-SOE-Freebies1

PRICE: FREE!

This package contains 9 SOE candy wrapper sized papers. 527 x 552 at 600 dpi for optimum printing. Papers are saved in JPG format for use in any graphics program.

Works in:
Any graphic program that supports JPG files.

PU/CU/S4O/S4H/Candy Wrapping

See TOU for complete details.

Download via 4Shared HERE