In the previous tutorial I showed you how to make a basic text box using the rectangle shape tool with a solid line. In this tutorial I will show you how to make textboxes using different line styles. And we will cover making your own line design to create unique, one of a kind, textboxes.
Tools we will use: Shapes Tool, Material Pallet, Styled Line Editor
Step 1 – We are going to create a new image using the same settings as Part 1.
Step 2 – We will be creating a textbox with an outer edge only and no interior fill. Set your Foreground color to the color of your choice for the outside border and set your Background color to Null. For this tutorial I am going to keep the black outline. See below:
Step 3 – Select the Shape Tool and use the Rectangle setting.
We will use the same settings for the rounded rectangle as we used in the previous tutorial except this time we will use a different line setting instead of solid and we will change our width to 8 instead of 10.
Mode: Draw Rectangle
Create On Vector : Checked
Horizontal Radius: 45.00
Vertical Radius: 45.00
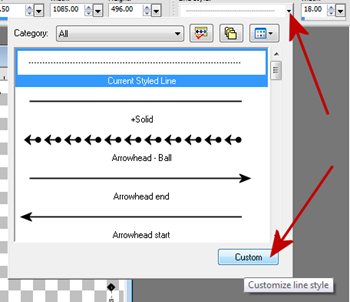
Line Style: Dash Dot (use the drop down menu next to the line style to select a new line style option)
Width: 8
Anti-alias: Checked
Starting at the top left corner, click your left mouse button then drag to the bottom right hand corner. Release your mouse button when you have reached the location where you want your shape to stop. Your image will appear as below.
Below are some samples using different line styles and sizes.
Arrowhead – Ball: Size 3
Barbed Wire: Size 4
Diamond: Size 18
Practice this with the different line settings and widths to achieve a different look. Playing with this will get you more comfortable with the using the rectangle shape tool and the options available.
Now we are going to walk through how to create your own unique line style.
Step 1 - Repeat steps 1 – 3 above but do not use a preset line style. Instead we will set all of our settings as before but then click on the drop down arrow next to the line style and at the bottom click on Custom.
The Styled Line Editor will appear

For this tutorial we are going to create a line that has a fleur and a ball. To make a continuous line without differences in the beginning and end we will need to set our First Cap and our Last Cap to Flat. Since they are already set to Flat by default, we do not need to change either of these settings. Instead we will change our different segment caps to create our new line. If it is not already set to flat for some reason, click on the drop down arrow next to the First Cap style and select the Flat cap option.
Repeat this for the Last Cap.
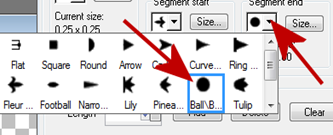
Step 4 – Place a Check mark in the box titled Different segment Caps. Then select the drop down box next to Segment Start. We are going to select the Fleur De Lis Cap as our starting segment.
Then click on the Size button to change the size to what we want our cap size to be. For this tutorial we are going to set the size to 4. Be sure to place a check mark in the box Link Axes. This will make the height the same as the width.
Step 5 – Repeat step 4 as above but using the drop down box next to Segment End to change the end segment. For this tutorial we are going to change the end segment to Ball.
Repeat the same steps as above to change the size of the end cap by clicking on the size button next to Segment End design and make sure it is also set to 4 width with the Link Axes checked.
This is what our new line style looks like so far:
To change the appearance we will change the Length of the style by clicking on the the up arrows next to the length settings. For this tutorial we will change this setting to 15.00 Our new line style will appear in the preview window below. You can play with the length settings to change the appearance of any line that you are creating. But for this tutorial we will leave it set to 15.00.
Step 6 – Once you have the line the way you want it, click on the Save as New Button and give your new line style a name. Then click OK.
Your new line will now appear in the drop down menu for line styles. I named my line as RDD-FleurBall. You can see it is now available in the drop down menu:
Now you can click on the vector layer to make it active, then click on the Shape Tool to use the drop down menu for the line style and change the style of your previously made textbox to your newly created line style.
I used my new RDD-FleurBall line at a setting of width 5 to achieve the textbox style as shown below:
Play with creating new line styles to add your own flair to your text boxes. The new line style you created can also be used for any vector that you create as it will now be available in the drop down menu for you to select at any time.
I would love to see the various line styles/textboxes all of you make using the Custom tool in the line style. You can use anything you like that is available as a cap option and change the size settings to create different effects. Play with this for awhile. We will be using more line options in our next textbox tutorial where we will add a unique break in our line to achieve a different effect.
I hope you enjoyed this tutorial and I look forward to seeing all of your new custom line textboxes!


No comments:
Post a Comment