This tutorial was written using Paint Shop Pro X but will work in other versions.
There are a couple different ways to create the vignette effect using PSP. Today, however, I am going to go over two simple ways to create the effect.
Step 1 – Of course this is the obvious step, open your PSP and open the image on which you wish to have the vignette effect. Go to Window/Duplicate. Then, close your original file. (This will prevent any permanent changes to the original image)
I will be using a picture of my sweet Great-niece. (Isn’t she adorable?)
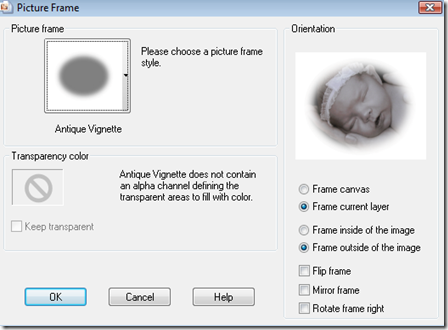
Step 2 – Go to Image/Picture Frame/Antique Vignette and use the following settings:
Press OK
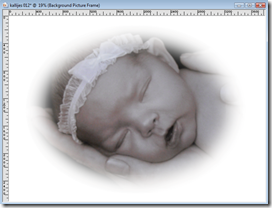
Step 3 – Go to Layers/Merge/Merge Down.
VIOLA! You have an instant vignette effect on your picture!
That wasn’t so hard now was it? Ok…so that was the quick an easy way to make the vignette. Now, let’s say you have a picture with some background in it (or other people) that you do not necessarily want in the vignette effect. For this part, I will be opening a new image to use.
Step 1 – Same as above. Open your PSP. Open your image. Got to Window/Duplicate. Close your original image.
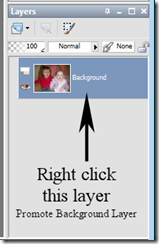
Step 2 – Right click on your Background layer and select Promote Background Layer.
Step 3 – Using your Selection Tool, create a Circle selection around the area you want to KEEP. In this part of the tutorial I will be using a picture that has two of my Great-nieces in it. I will isolate just one, and maybe just her head area. (See below – notice the selection around the girl on the left?)
Step 4 – Go to Image/Crop To Selection. (You should have something similar to what is below)
Step 5 – Repeat the vignette picture frame as we did in the first part of the tutorial using the same settings. Then go to Layers/Merge/Merge Down. (You will have something similar to the image below)
VIOLA! You just created your second vignette!
That is all I will cover on vignettes for today. The other methods will require the use of masks and/or paint brushes. So, that is another tut for another day as I would like to cover how to create masks and use masks in addition to special paint brushes. So, it might be a little more detailed than this.
For now, this should give you some practice with the Picture Frame Tool and the Selections Tools in PSP. I hope you enjoyed this tutorial and will find the time to try some of the other frames readily available in PSP!


No comments:
Post a Comment