-->

Friday, May 27, 2011

Creative Boxes Using Brackets

I found that Lynn had asked “How do you make these?” on the Wrapcandy forum.  So, I just had to take the challenge.  Thank you Lynn for the inspiration!

I wanted to make this as easy as possible so I went ahead and made a bracket brush for this tutorial. 

This tutorial was written using Corel Paint Shop Pro X but will work easily in earlier as well as newer versions.


Materials:

My Bracket Brush (get it HERE)  Download the brush and the accompanying brush script  and place them in your Brushes folder within PSP or within My Documents/My PSP Files/Brushes. 


Step 1 – Create a new image using the following settings:

image

Step 2 – Set your foreground color to the color you want for your brackets and the background color to the color or pattern you want for your background.  For this tutorial I am using a polka dot pattern for my background and a couple shades of purple darker for my foreground color. 

image

Step 3 – Go to the layer titled Raster 1 in your Layers Pallet.  Right click and duplicate twice.  Your Layers Pallet should look like the following:

image

Step 4 – Make Copy (2) of Raster 1 the ACTIVE layer and then select your Paint Brush tool.

image

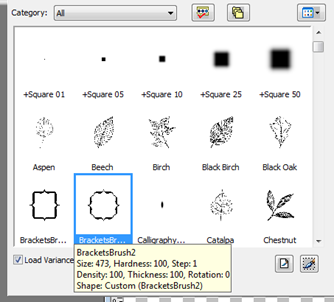
Find the brush titled BracketsBrush2. Be sure the Load Variance button is checked.

image

And then place the brush in the center of the image and “Paint” your bracket onto the workspace.

image

Step 5 - Go to your scripts toolbar and using the drop down box select the Scripts Restricted folder and run the Center Layer script.  This will make sure your brackets are centered.

image

Step 6 – Using your Magic Wand tool

image

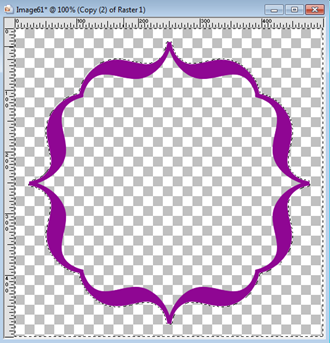
select the area OUTSIDE the brackets.  Your “marching ants” will appear as follows:

image

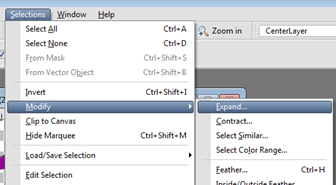
Step 7 – Go to Selections/Modify/Expand

image

and use the following settings:

image

Step 8 – Make the layer titled Copy of Raster 1 the ACTIVE layer and then select your Flood Fill tool.

image

Right click and flood fill the area OUTSIDE the bracket with your background pattern or color. Then go to Selections/Select None.  My image appears as below:

image

Step 9 – Make the layer titled Raster 1 the ACTIVE layer and flood fill using the color of your choice.  For this tutorial I am using white.  My image appears as below:

image

Step 10 – Make the layer with your bracket the ACTIVE layer (Should be Copy (2) of Raster 1).  And go to Selections/Select All then Selections/Float and then Selections/Defloat. My brackets are selected and the workspace appears as below:

image

Step 11 – Go to Layers/New Raster layer and add a new layer.  Then go to Effects/3D Effects/Cutout and use the following settings:

image

Go to Selections/Select None.

Step 12 – Make the layer with your brackets the ACTIVE layer and go to Effect/3D Effects/Drop Shadow and use the following settings:

image

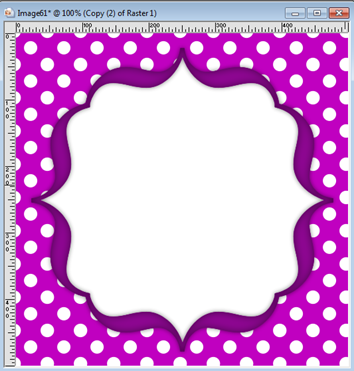
Our image now appears as below:

image

Now you can leave these as layers and save the file as a PSP file and just change the colors/backgrounds as you would like for future designs. Here are a couple more examples using different backgrounds and adding some text and elements.

image

image

image


I hope you enjoyed this tutorial and I look forward to seeing all of your creations!

Creating Textboxes/Frames in PSP – Part 5

This is the last tutorial in the Textboxes/Frames series.  In the previous tutorial I showed you how to create unique textboxes/frames using the Vector Paint script.  In this tutorial we will be using the script Vector Tube which works along the same lines as the Vector Paint script but it uses your existing PSP Tubes instead of a paint brush.  What a handy little tool to have to make extra special textboxes/frames!  I am sure you will love this script just as much as the Vector Paint script!
This tutorial was written in Corel Paint Shop Pro X but will work in earlier and newer versions.

Materials:

Vector Tube script.  You can find it HERE!  Read and follow the instructions for installation of the script.

Got the script? Opened your PSP?  Ready?  And we are off! 

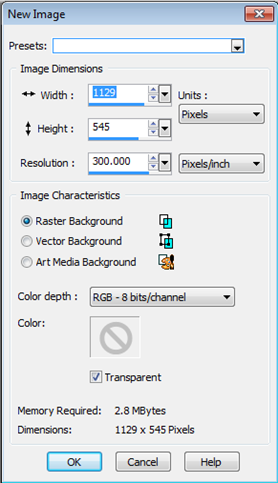
Step 1 – Create a new file using the following settings:

image

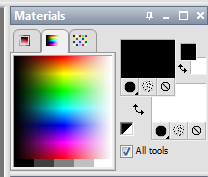
Step 2 – Set your background color to white and your foreground color to any color (not real important since we will be using Tubes and not using the foreground color).  For this tutorial I set my foreground color to black.

image

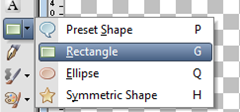
Step 3 – Click on your preset shapes tool and select the rectangle shape.

image

On the top of your toolbar, for the shapes tool, use the following settings:

Mode: Draw Rectangle

image

Create On Vector : Checked

Horizontal Radius:  45.00

Vertical Radius:  45.00

Line Style:  Solid

Width: 0

Anti-alias: Checked

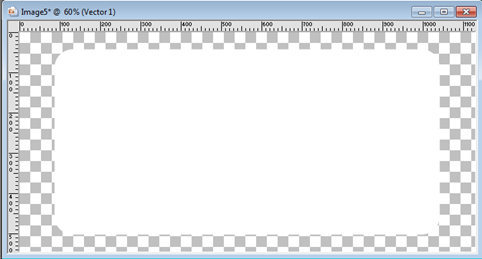
Starting at the top left  (give yourself space at the top, bottom and sides for the effect we will be adding) and click your left mouse button then drag to the bottom right hand corner.  Release your mouse button when you have reached the location where you want your shape to stop. Your image will appear as below.

image

Step 4 – Using your Pick Tool (For PSP 9 and earlier this would be the Raster Deform Tool)

image

select the rectangle we just created and right click.  Select Convert to Path.

image

Step 5 – Make sure your Script Tool is on the toolbar.  If it is not, go to View, Toolbars and select Script:

image

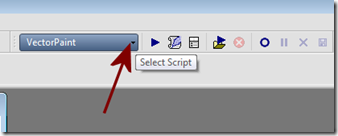
Now click on the dropdown box button on your script selection tool:

image

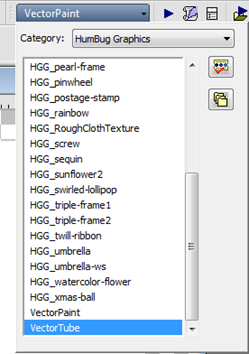
And then find the script you downloaded titled VectorTube:

image

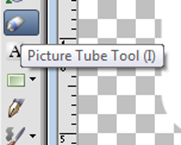
Step 6 – Click on your Picture Tube Tool:

image

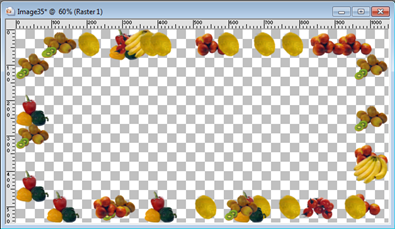
and select the picture tube you would like to use.  Adjust your settings according to the size and the tube that you will be using.  For this tutorial I am using a fruit tube I have and using the following settings:

Scale:  100

Step:  150

Placement Mode:  Random

Selection Mode:  Random

You will need to play with these settings to achieve the look you want depending on your tube being used.


Step 7 – Once you have your settings to your liking, press the Play button on your script toolbar.

image

The script will run and my image now appears as below (Yours will vary depending on the tube you have chosen):

image

Step 8 – Your Layers Pallet will appear as below:

image

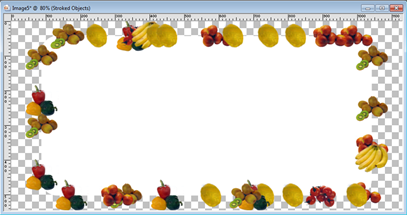
Be sure the Stroked Objects is your active layer and go to Edit/Copy.  Then Edit/Paste as a New Image.  And our fruit textbox now appears as below:

image

You can continue using the same shape you made earlier and select the Edit/Undo Script option and change your picture tube as often as you would like to make different Picture Tube Textbox Effects. Here are some more samples using different Tubes with varying settings:

image

image

image

This is one of the most fun scripts to play with.  The possibilities are endless with this script.  There are many tubes out on the internet for free, or you can create your own to use.  You can create unique textboxes/frames to meet any of your design needs.  It is great to use to create journal tags, candy wrapper textboxes, picture frames, and so much more!  Do I really have to say it again??  Go! Get out of here and go play!  Be creative!  And most importantly….have fun learning your Paint Shop Pro!  I hope you enjoyed this tutorial and the Textboxes/Frames series!

image

Creating Textboxes/Frames in PSP – Part 4

It has been awhile since I have had a chance to post anything to my blog.  Oh how I have missed you blog and all my faithful followers!  Most of you know I am a graduate student and have been extremely busy this semester with school, teaching, research and raising a teenaged son all on my own.  Phew!  I get tired just thinking about it.  Where does the time go?  Where does my energy come from?  At any rate, we are off for the summer and I am excited that this fall will be my last semester.  I have one more class to go and to finish my research and thesis.  Wish me luck! 


So, since I now have time to visit with all of you I am posting the 4th part to the textbox/frames series. There are 5 parts.  With all luck I will be posting number 5 today as well! So, here we go!


This tutorial was written using Corel Paint Shop Pro X but will work in newer versions and possibly older versions down to 8 I believe. It uses a fabulous script I found while playing in Google one day.  I just know you will LOVE this script! 


Materials:

Vector Paint script.  You can find it HERE!  Read and follow the instructions for installation of the script.


Got the script? Opened your PSP?  Ready?  And we are off! 


Step 1 – Create a new file using the following settings:


image


Step 2 – Set your background color to white and your foreground color to the color of your choice for the effect we will be creating on our textbox/frame.  For this tutorial I will be using black as my effect color to make viewing this tutorial easier.

image

Step 3 – Click on your preset shapes tool and select the rectangle shape.

image


On the top of your toolbar, for the shapes tool, use the following settings:

Mode: Draw Rectangle

image

Create On Vector : Checked

Horizontal Radius:  45.00

Vertical Radius:  45.00

Line Style:  Solid

Width: 0

Anti-alias: Checked

Starting at the top left  (give yourself space at the top, bottom and sides for the effect we will be adding) and click your left mouse button then drag to the bottom right hand corner.  Release your mouse button when you have reached the location where you want your shape to stop. Your image will appear as below.

image


Step 4 – Using your Pick Tool (For PSP 9 and earlier this would be the Raster Deform Tool)

image

select the rectangle we just created and right click.  Select Convert to Path.

image


Step 5 – Make sure your Script Tool is on the toolbar.  If it is not, go to View, Toolbars and select Script:

image

Now click on the dropdown box button on your script selection tool:

image

And then find the script you downloaded titled VectorPaint:

image

Step 6 – Go to your Paint Brush Tool:

image

And select the paint brush you would like to use.  For this tutorial I am using a leaf brush I had previously converted from an Adobe Photoshop brush.  You can find the tutorial on converting Photoshop brushes for use in PSP HERE

Here is the brush I selected:

image


You will need to play around with your settings depending on the paint brush you are using.  For this tutorial I am using the following settings (Yours may vary depending on the brush):

Size:  50

Step:  125

Density: 100

Rotation:  33

Opacity:  100

Blend Mode: Normal


Step 7 – Once you have your settings to your liking, press the Play button on your script toolbar.

image

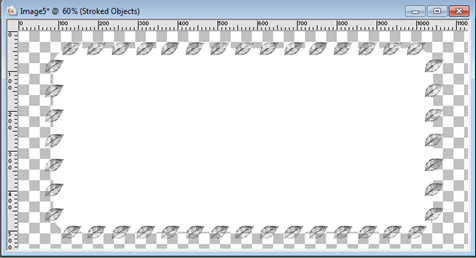
The script will run and my image now appears as below (Yours will vary depending on the brush you have chosen):

image


Step 8 – Your Layers Pallet will appear as below:

image

Be sure the Stroked Objects is your active layer and go to Edit/Copy.  Then Edit/Paste as a New Image.  And our leaf textbox now appears as below:

image

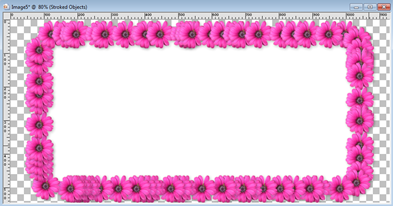
You can continue using the same shape you made earlier and select the Edit/Undo Script option and change your paint brush as often as you would like to make different Painted Textbox Effects. Here are some more samples using different paint brushes with varying settings:

image

image

This one below is probably one of my favorites….I have flood filled the background so you can see it better:

image

This is one of the most fun scripts to play with.  The possibilities are endless with this script.  There are many brushes out on the internet for free, or you can create your own to use.  You can create unique textboxes/frames to meet any of your design needs.  It is great to use to create journal tags, candy wrapper textboxes, picture frames, and so much more!  Now go! Get out of here and go play!  Be creative!  And most importantly….have fun learning your Paint Shop Pro!  I hope you enjoyed this tutorial….and it looks like I WILL have time to finish the textbox series today….look for #5 coming soon!

image