-->

Sunday, October 17, 2010

Grayscale Images as Overlays

.

Previously, I had posted a tutorial on colorizing grayscale images using the Colorize tool in Paint Shop Pro.  The difficulty with colorizing a grayscale image is to get the color to match your color scheme the best.  Often, this means using the colorize in combination with adjusting the brightness and/or contrast and even then you may not get it exact.  So this tutorial will show you how to use the grayscale image as an overlay using your current color scheme.

This tutorial was written using Corel Paint Shop Pro X but will work in earlier as well as newer versions. For this tutorial I am using a grayscale frame that I created specifically for this tutorial.  I have two different small textured frames I created for you to practice with. You can download them for free HERE.

Step 1 – Open a grayscale image.  Go to Window/Duplicate and then close out the original.  This will allow you to make changes without making permanent changes to the original image.

Step 2 – Using your magic wand, select the area inside and outside the frame and then go to Selections/Invert

image

Your image will appear as below:

image 

Notice the “marching ants” on the inside and outside of the frame creating a selection around the frame?

Step 3 – Go to Layers/New Raster Layer and create a new layer. 

Step 4 – Click on your foreground materials pallet and use the dropper tool to select the color you want from the swatch or using the RGB values you want to use. Flood fill the selection on the new layer using the color you selected.   For this tutorial I am using a color from a color swatch.

Your image will appear as below:

image

Step 5 – Go to Selections/Select None.  Then arrange the layers as to move the new raster layer with the color BELOW the original layer. Below you will see the color layer as Raster 2 being positioned above Raster 1.  Using your mouse, click on the layer and drag it below Raster 1.

From this:

image

To this:

image

Your image will now appear as below:

image

Step 6 – Make the grayscale layer as the active layer:

image

Select the Blend Mode Tool above the active layer:

image

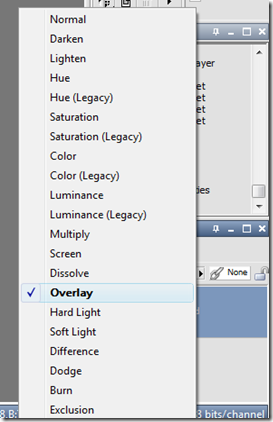
Change the mode to Overlay:

image

Your image will now appear as below:

image

Now, you have a couple options.  You can either go to Layers/Merge/Merge Visible and then save the image in the format you would like.  Or you can export as a PNG file and then save the product with layers in tact for future use as a template.

Relax, play, be creative, and most importantly, have fun with your PSP! I hope you enjoyed this tutorial and look forward to seeing some of your creations!

Wednesday, October 6, 2010

Converting Photoshop Brushes to PSP Brushes

Ever find that absolutely “must have” brush only to discover it is in Adobe Photoshop format?  Well, for years, since I have had both Corel Paint Shop Pro as well as Adobe Photoshop, I would create a transparent PNG file in Photoshop and then pull the PNG file up in my Paint Shop Pro and then save it as a custom brush.  But….I realize there are many PSP users out there who do not have this luxury.  I scoured the net on many occasions looking for a reliable, quality converter.  I found that AbrViewer is the best there is and the easiest to use.

So, I put this tutorial together  to show you how to use AbrViewer to convert Photoshop Brushes to Paint Shop Pro Brushes.  This tutorial was written using PSP X, but should work in all versions of PSP which support PNG files.

Tools you will need:

AbrViewer – get it here: http://abrviewer.sourceforge.net/

A Photoshop Brush set

Paint Shop Pro.

TIP!  When you download AbrViewer, save it in a file named AbrViewer so you will always know were it is! This does not install on your computer so you will need to access the file location to use it.

Step 1 – Download and install into a folder the AbrViewer files

Step 2 – Open Abr Viewer

Step 3 – Go to File/ Open Brush Sets and select the location of the brush set you want to convert and then select the brush file. Click Open

image

Thumbnails of the brushes in the set will appear at the top of the screen:

image

Step 4 – Go to Export/Thumbnails and select the folder to export the thumbnails to. Click OK.  I suggest you export them to the same location as the brush set so that they are all kept together.

image

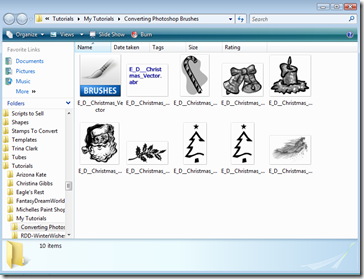
Now all the brushes are saved in your folder as a PNG file:

image

Step 5 – Open your PSP and go to File/Open and select the folder which contains the new PNG forms of the brushes.  Select one of the brushes to open and click Open.

image

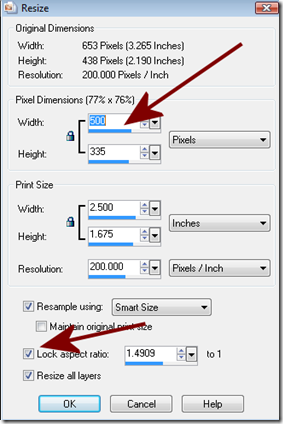
Step 6 – With the PNG file open go to Image/Resize and make sure neither the width or the height is larger than 500 pixels. In our case, the width is larger so we want to set the resize to make it only 500 pixels wide.  Be sure lock aspect ratio is selected and then press OK.

image

Step 7 – Go to File/Export/Custom Brush

image

Give the brush a name, make sure Save Variance is checked, credit the author and then click OK:

image

You are now ready to use the Photoshop Brush as a Paint Shop Pro Brush!  Once you have converted all the PNG files for that brush set, you are free to delete the PNG files (but make sure NOT to delete the original ABR file).  This will free space on your computer as you no longer need the PNG file.

To use the brush: Set your foreground color to the color you want to “paint” with and then select your Brush Tool:

image

Select the drop down box next to the paint brush selector and select the brush you just converted (Make sure Load Variance is clicked):

image

Go to Layers/New Raster Layer and then place the brush where you want it (an outline of the paint brush with variances will appear)

image

and then left click to “paint” your workspace.  Below is a sample of how the new brush was used:

image

And now you too can make use of all of those wonderful Adobe Photoshop brushes!  I hope you enjoyed this tutorial!

Saturday, October 2, 2010

Color Swatches and Wrap Candy Program

I have written a tutorial on using color swatches and PSP, so I thought this would be good to make as others using Wrap Candy might have the swatches and want to know how to use them effectively.

Step 1 – Open your Wrap Candy program and create a new template.  For this tutorial I am using the Mini Bars Template.

Step 2 – Go to Insert Image

image

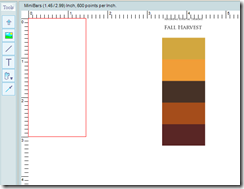
Find the Color Swatch you want to use and it will be put into your Wrap Candy file.  For this tutorial I am using the Fall Harvest Swatch shared on the forum.  You may have to shrink it down a bit to fit where all 5 colors are visible.

Step 3 – Move the swatch off your workspace to the right.

image

Step 4 – Select the Catch Color Tool

image 

Step 5 – Using the dropper click on each of the 5 colors one at a time.  They will appear in the toolbar above as Custom Label Colors

image

Step 6 – Create the rectangle for the wrapper

image

Step 7 – Once you have your rectangle in place click on the Fill Color button in the toolbar.

image

Your color pallet will pop up and your custom colors from the swatch will be in the custom color section of the color pallet.

image

You can now use the custom label colors for any shapes, contours, text, or fills that you want to use on your candy wrapper.  Save the cwr file and the custom label colors will stay in tact with that template.

I hope this was helpful!