-->

Sunday, July 25, 2010

Christmas Paper Pack SOE Sized

RDD-ChristmasPapersDisplay
PRICE:  FREE
This package comes with 18 SOE sized digital papers in various Christmas patterns. Papers are created at 300 ppi for optimal printing.
Also great as a background for textboxes, paint cans, journal tags, hanging tags and any other digital scrapping and candy wrapping project.
USES:  CU/PU/S4H/S4O/Candy Wrapping
See TOU for complete details.

Click  HERE to snag.


Everything’s Just Daisy SOE Papers with Bonus

RDD-EverythingJustDaisyDisplay
PRICE:  FREE
This package comes with 10 SOE sized daisy patterned papers and a bonus of three daisy borders!
You will notice one of the borders looks as if it is cut off.  This is so you can link that particular border for larger projects. All borders can be used for larger projects as well. Each border is 5.5 wide.  Rotate it 90 degrees and you have a quick side border for your SOE. 
Also great as a background for textboxes, paint cans, journal tags, hanging tags and any other digital scrapping and candy wrapping project.
USES:  CU/PU/S4H/S4O/Candy Wrapping
See TOU for complete details.

Click  HERE  to snag.


Friday, July 23, 2010

Colorizing Grayscale Images

So, many digital scrappers out there will offer a grayscale PNG file for your use.  These come in handy when you are in a pinch and do not have time to design the element yourself.   So, this tutorial will show you how to colorize a grayscale image.  I will be using the Rickrack made in an earlier tutorial that I have made into a grayscale.  But you can use any grayscale image you have available.

Step 1 – Open the PNG file you wish to use.  (Pretty basic right?)

The image I am using appears as below:

image 

Step 2 – Select Adjust/Hue and Saturation/Colorize.

Step 3 – Pick the color you want to use.  For deeper colors (depending on how the grayscale image was saved) you can decrease your saturation.  For the purpose of this tut we will change the rickrack to blue.  See below:

image

Noticed I used a lower saturation point.  For a brighter blue you can slide the saturation to 255 or however bright you want it.

Our rick rack now looks like the image below.

image

The next step is optional:

Optional Step – Increase your brightness or contrast by selecting Adjust/Brightness And Contrast/Brightness/Contrast.  I want to make mine darker so I will use the settings below:

image

My Rickrack now appears as below:

image

Now I have a new color of rickrack without having to go through all the steps necessary to create a new one from scratch!

You will have to play with your settings depending on the image you are using.  I hope you found this helpful!

RickRack Made Easy

RickRack makes great borders for wrappers, stationary, invites, digital scrapping and more!  I like to make digital rickrack and then print it out, cut it out and make handmade cards for family and friends.  Whatever your use, this tutorial will show you how to make digital rickrack quickly and easily. 

Step 1 – Select File/ New and create a new image using the settings below:

image

Please note that your resolution will depend on how you plan to use the graphic.  For web you can use a smaller resolution such as 72 or 96.  For print quality the higher the resolution the better the print quality.  Generally 300 is fine, but for more detailed graphics you can use 600 (I use 600 when creating posters or invites that will be printed).


Step 2 - Using your selection tool, create a custom selection.  You will find the custom selections tool here:

image

Now make a selection using the following settings:

image

Step 3 – Flood Fill the area with BLACK.  And then choose Selections/Select None. Your image should appear as below.

image

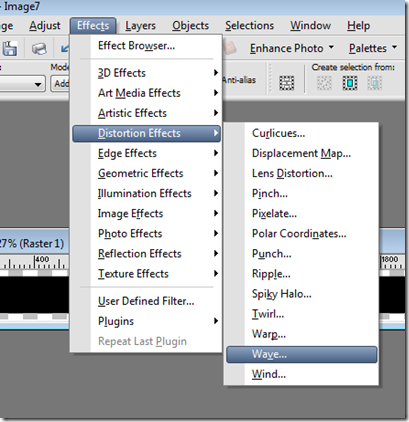
Step 4 – Select Effects/Distortion Effects/Wave.  See below:

image

Use the settings below:

image

Step 5 – Using your magic wand, select the black area and flood fill with your desired color or pattern.  (DO NOT SELECT NONE JUST YET) Your image should now appear as below:

image

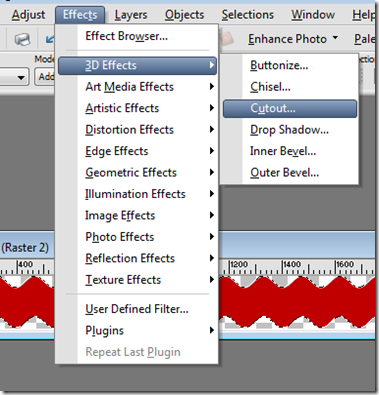
Step 6 – Create a new raster layer:  Layers/New Raster Layer.  Then choose Effects/3D Effects/Cutout.  See below:

image

Apply a cutout using the following settings:

image

This will give your rickrack a 3D appearance. Once you have made your cutout, choose Layers/Merge/Merge Visible and then Selections/Select None.

Step 7 – Now we will create a halftone texture on the rickrack.  Choose Effects/Artistic Effects/Halftone.  Use the following settings:

image

You can play with this to achieve a different effect if you want.

Step 8 – Now export the new rickrack as a transparent PNG file By selecting File/Export/PNG Optimizer. Save the file under a name of your choice in a folder where you can find it again.  BEFORE you close the file, you can also save this as a Tube for future use and colorizing. (See Colorizing Tut)

To save as a Tube select File/Export/Picture Tube and use the following settings:

image

Be sure to give it a name where indicated (Tube Name) and then press OK. 


And there you go.  You now have rickrack for whatever designing need!

Gingham Pattern

Want Gingham?  You’ve come to the right place to learn how to make a Gingham pattern in Paint Shop Pro.  You might be able to do the same using Adobe Photoshop, but all screen shots are using Corel Paint Shop Pro X.

Step 1 – Select File/New and create a new image using the following settings:

image

Step 2 – Make sure your Grid, and Snap to Grid are checked.  To do this select View and make sure your Grid and Snap to Grid are checked (see below)

image

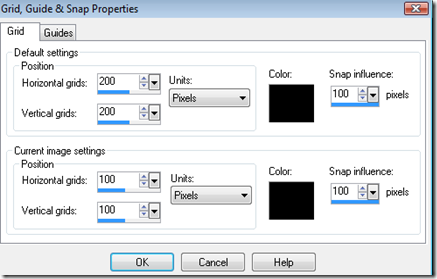
Step 3 – Change your Grid, Guide & Snap Properties.  To do this select View/Change Grid, Guide & Snap Properties.  The default will come up.  Change your settings to what is shown below.

image

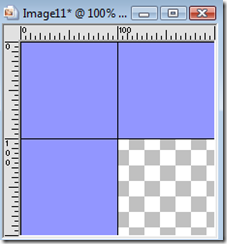
Your transparent new image should now look like this:

image

Step 4.  Using your Selection tool: Create a Square selection placing your marker at the center of the workspace and move to the upper left.  **Remember from the 2 layer button tut that you can use your horizontal and vertical markers to find the exact center for your selection.  In this tut your exact center would be 100 horizontal and 100 vertical. You should now see “marching ants” around the top left square.  (See Below)

image

Step 5 – Flood Fill with your color choice. Then Selections/Select None

image

Step 6 – Duplicate the layer and then select Image/Flip.  Then Go back to layer 1 and duplicate it again and select Image/Mirror.  To DUPLICATE:  Right click on the layer and select Duplicate. Now your image should appear as below.

image

Step 7 – Go to your original layer 1 and make it invisible (DO NOT DELETE IT) just click on the eye next to it until you can no longer see that layer and your image appears as below:

image

Step 8 – Select one of the other two layers and then select Layers/Merge/Merge Visible. Double click the layer and change the layer properties to 50 Opacity.  See below:

image

Step 9 – Make your original layer visible again and then select Layers/Merge/Merge Visible.  Your image should now appear as below:

image

Step 10 – Create a new raster layer by selecting Layers/new Raster Layer.  In your layers pallet move this to under the Merged Layer and flood fill with white. Then select Layers/Merge/Merge Visible.  Your image should now appear as below:

image

Step 11 – Now we will change the size of our canvas to create the gingham checked pattern.  Go to Image/Canvas Size and change to the settings below:

image

Your image should now appear as below:

image

Step 12 – In your layers pallet make sure you are on your merged layer.  Then Duplicate the layer and select Image/Mirror. Then select Layers/Merge/Merge Visible.  Your image should appear as below:

image

Step 13 – You should now have one layer that is titled Merge.  Duplicate that layer and then select Image/Flip.  Then Layers/Merge/Merge Visible.  Your image should now appear as below:

image

Step 14 – Now we are going to give it a halftone effect.  Select Effects/Artistic Effects/Halftone.  See below:

image

Change your halftone settings to the settings below:

image

Your image should now appear as below:

image

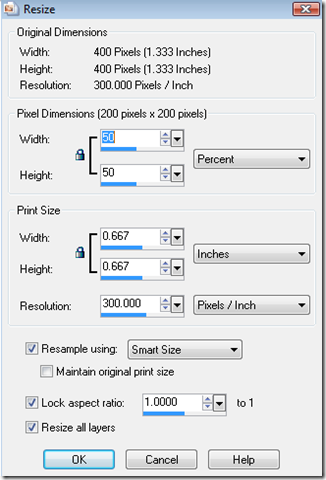
Your final step is to resize to a PSP patterns size and save as a pattern in your patterns folder.  To do this:  Select Image/Resize/ and use the settings below:

image

Finally select File/SaveAs and name it whatever you like. Save to My Documents/MY PSP Files/Patterns and it will be available whenever you want it. 

Play with the colors and halftone sizing to achieve the look you are wanting.  I hope you found this useful and now….go play and have fun!

Thursday, July 22, 2010

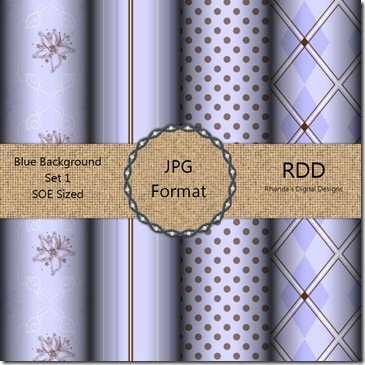
Blue SOE Backgrounds Set 1

RDD-PaperDisplay
PRICE: SORRY!  THIS FILE HAS BEEN LOST IN CYBER WORLD!
This set contains 4 custom made SOE (Standard Candy Wrapper) sized background papers. These backgrounds are in JPG format and can be used in any graphics program that supports JPG format.
COLORS:  Two shades of blue with white and chocolate.
Also great as a background for textboxes, journal tags, hanging tags and any other digital scrapping and candy wrapping project.
USES:  CU/PU/S4H/S4O/Candy Wrapping
See TOU for complete details.


Wednesday, July 21, 2010

2 Layer Button

This tutorial was written using PSPX  but will work in earlier versions, some tools may be different in your version.

Step 1 – Open a new image using the settings below.

image

Step 2 – Using your selection tool create a circle making sure your starting points are at 300 and 300 then pull outward until you reach just before the edge of your workspace.

When you position your cursor your 300 vertical and 300 horizontal marks will appear as white.  That is the absolute center of your canvas.  Then you click with your mouse and pull outward.
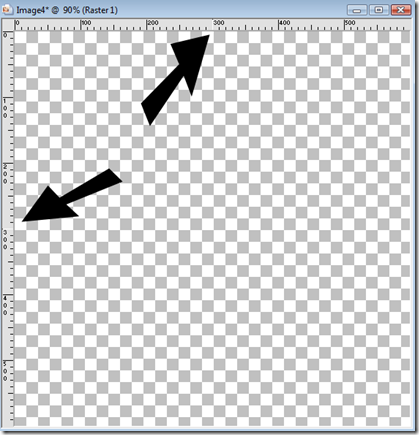
image

After you pull outward your “marching ants” will appear as below.


image

Step 3 – Go to Selections/Modify/Shape Based Anti-alias and check Outside.  Press OK.  This will removed jagged edges along our selection area. Then Flood Fill with the color or pattern of your choice.

image

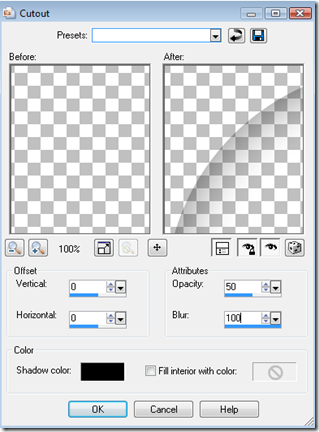
Step 4 – Keeping your selection add a new raster layer.  Then select Effects/3D Effects/ Cut Out.  Use the following settings:
image

Press OK.  Then Select None and then select Layers/Merge/Merge Down.

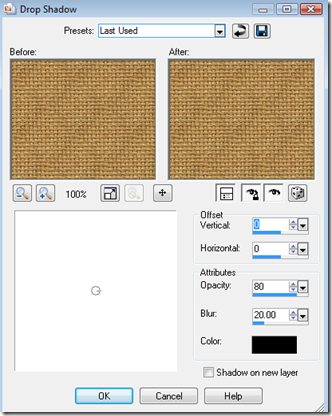
Step 5 – Repeat the above creating a smaller circle, flood fill, new raster layer, effects, 3D effects, Cutout.  BEFORE YOU MERGE:  Select the layer you just flood filled and then select Effect/3D Effects/Drop Shadow and use the following settings:
image

Then select the layer with the Cut Out and select Layers/Merge/Merge Down.  Then use Layers/Merge/Merge Down again so that all layers are now one layer and your bottom and top buttons are mounted on top of each other.

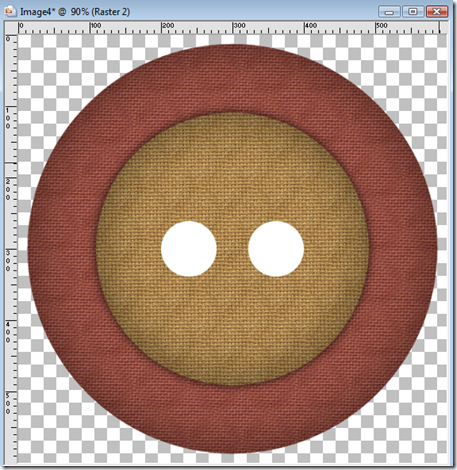
Step 6 – Create a New Raster Layer.  Using your selection tool, starting at your midpoint of 300 horizontal and 300 vertical create a small circle.  (This is the start of your button holes).  Then Selections/Modify/Shape Based Anti-alias/Outside.Flood Fill with WHITE.   Then Select None. Your image should appear as below,

image

Using your Pick Tool (Mover if using versions below X), change your position x to 200.

image 

Step 7 – Duplicate your small circle layer and then select Image/Mirror then Layers/Merge/Merge Down.  You should now have an image that looks like the one below.
image

Step 8 – Using your magic wand, select the two white circles and then select the layer that has your button on it and press DELETE. Keeping your selection add a New Raster Layer and select Effect/3D Effects/Cutout and use the following settings:

image

Make sure the layer with your two small circles is invisible. Select the layer with your new small cut outs and select Effect/3D Effects/Drop Shadow and use the same settings for your previous drop shadow.  Then Layers/Merge/Merge Visible.  Your button is now complete.

image

If you want to add thread to your button, add a new raster layer and using your center markers (300 x 300) create a rectangle and then use Selections/Modify/Feather/20 and flood fill with the color of your choice. Your image should appear as below.

image

Keeping the area selected use Effects/Artistic Effects/Halftone and use the following settings:

image

Keeping the area selected use Adjust/Add Remove Noise/Add Noise and use the following settings:

image

Then Select None and using your Script tool…..run the Center Layer Script that comes with PSP. (If you cannot find this it is under Scripts Restricted/Center Layer).  Your image should appear now as below.

image 

Now let’s smooth out the area and make is appear as if it is inside the circles.  Select the layer that has your small white circles we used to make our button holes.  Using your magic wand select both the white circles and then Selections/Invert.  Return to the layer that has your thread on it. Using your eraser tool erase around the outside of the circles just to the left and right.

image

Select None.  Then add a drop shadow to your thread layer using the same drop shadow properties as before. 

Then select the layer with your two small circles we used for the holes and Delete Layer.  Then Layers/Merge/Merge Visible and your button with thread is now complete!

image

You can play around with different settings for your cut outs and drop shadows and threading.  Play around and change it up as you need, but most importantly…..have fun!
I created a script while writing this tutorial.  You can click HERE  to download it for FREE! Works in PSP 9 and Up.